Kayaking in La Jolla, CA

La Jolla California is known for crystal clear water, dramatic sea side cliffs, and its abundant wildlife. The best way to enjoy the gorgeous views and array of sea life is to go on a kayaking adventure.

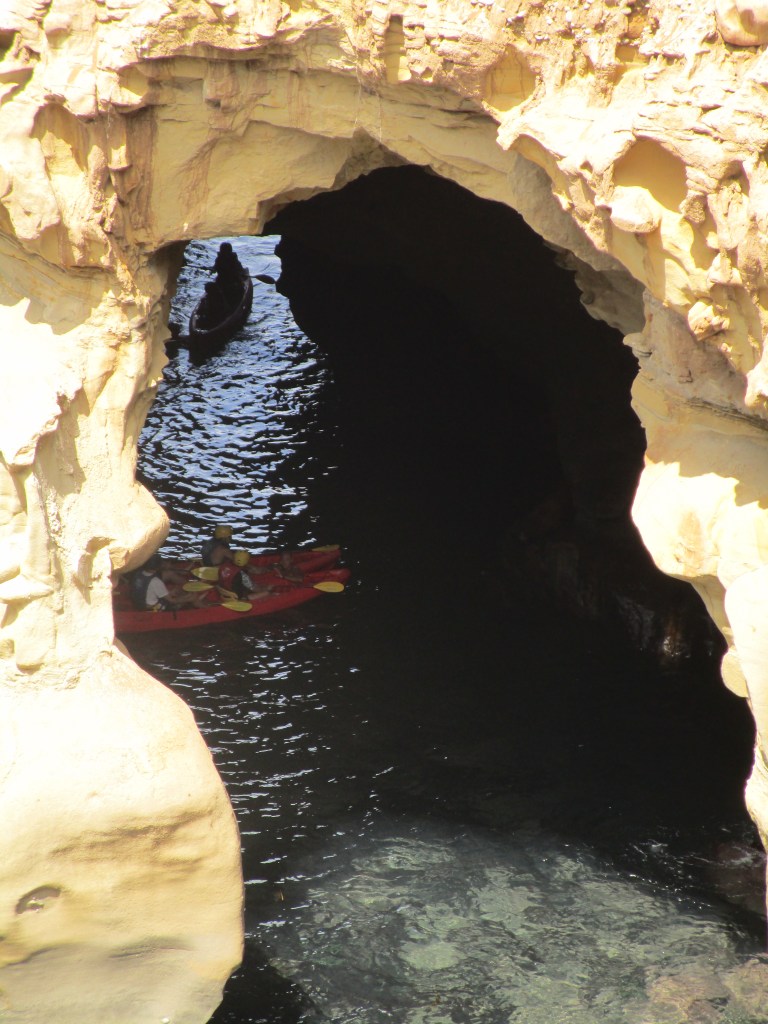
If you do not own your own kayak don’t despair, there are many tourist companies in the area that you can either rent a kayak from or go on a kayaking tour with. Many of these companies offer kayaking tours through the famed sea caves as well as snorkeling adventures with leopard sharks!

Our Kayak

Brandon and I decided our next fun hobby would be kayaking and we thought that La Jolla would be the perfect place for our kayak’s maiden voyage. Our friend Jacob goes to La Jolla often and went with us to help us navigate kayaking for the first time. We have a 13 foot tandem Brooklyn Kayak. Make sure you have a certified PFD (personal Flotation Device) that is designed for Kayaking. Normal life vests go higher up on the sides and limit your arm movement. This makes it harder to paddle and can cause the undersides of your arms to be rubbed raw. Brandon and I both have Hobie kayaking PFDs.

Kayaking in La Jolla

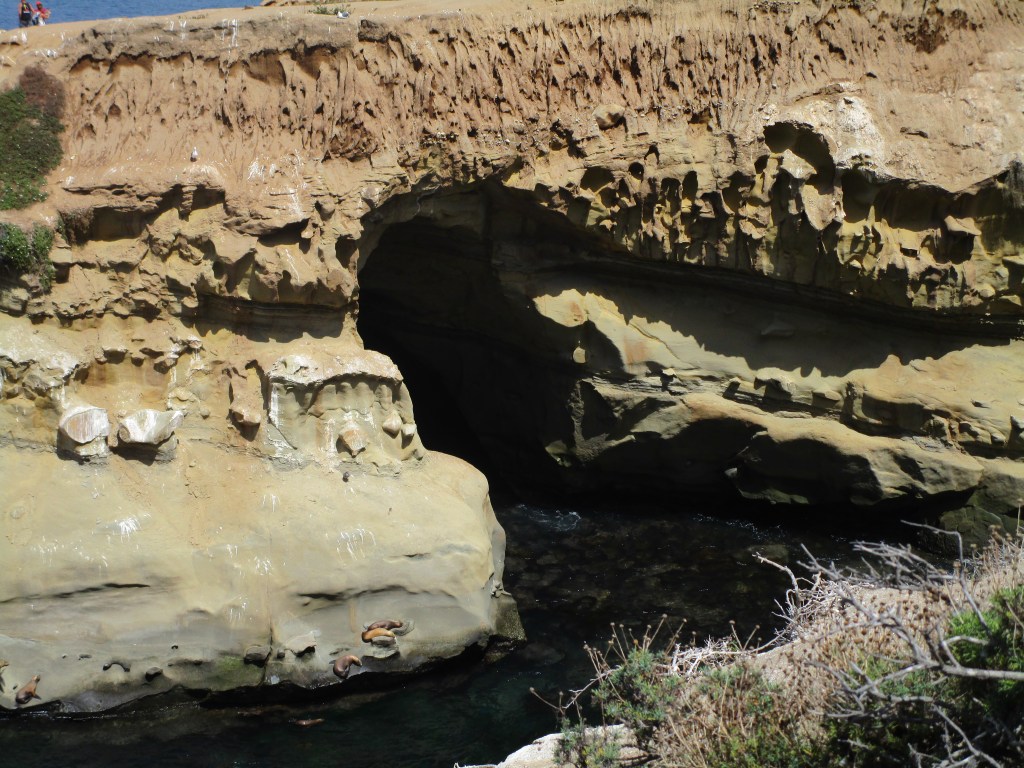
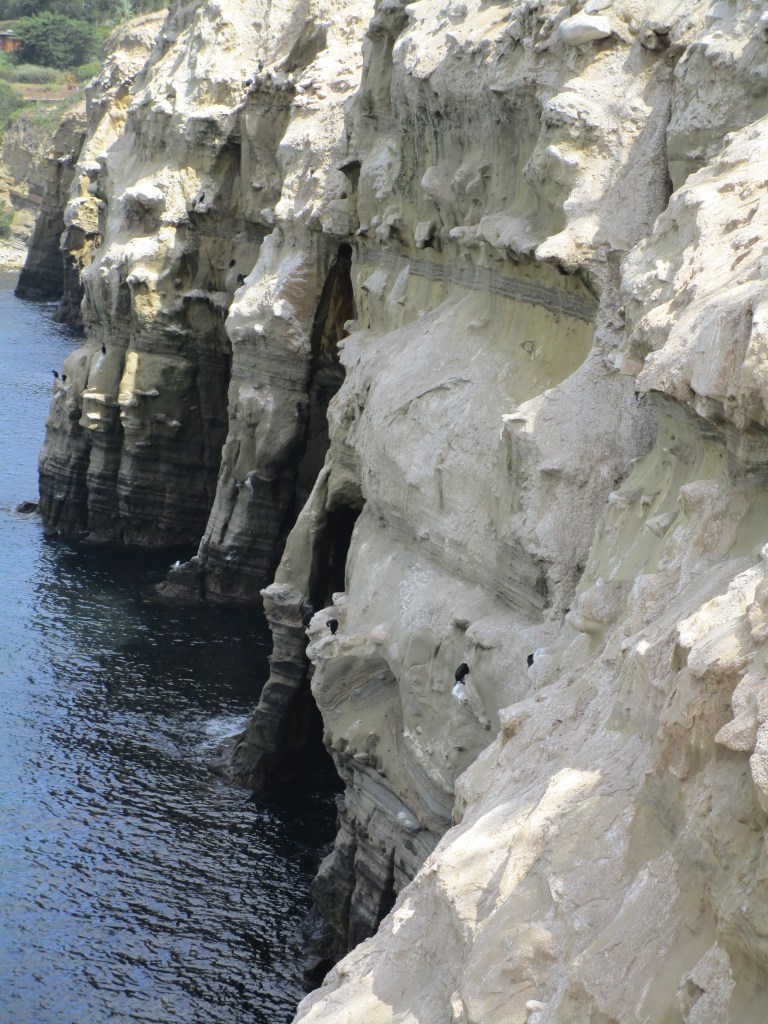
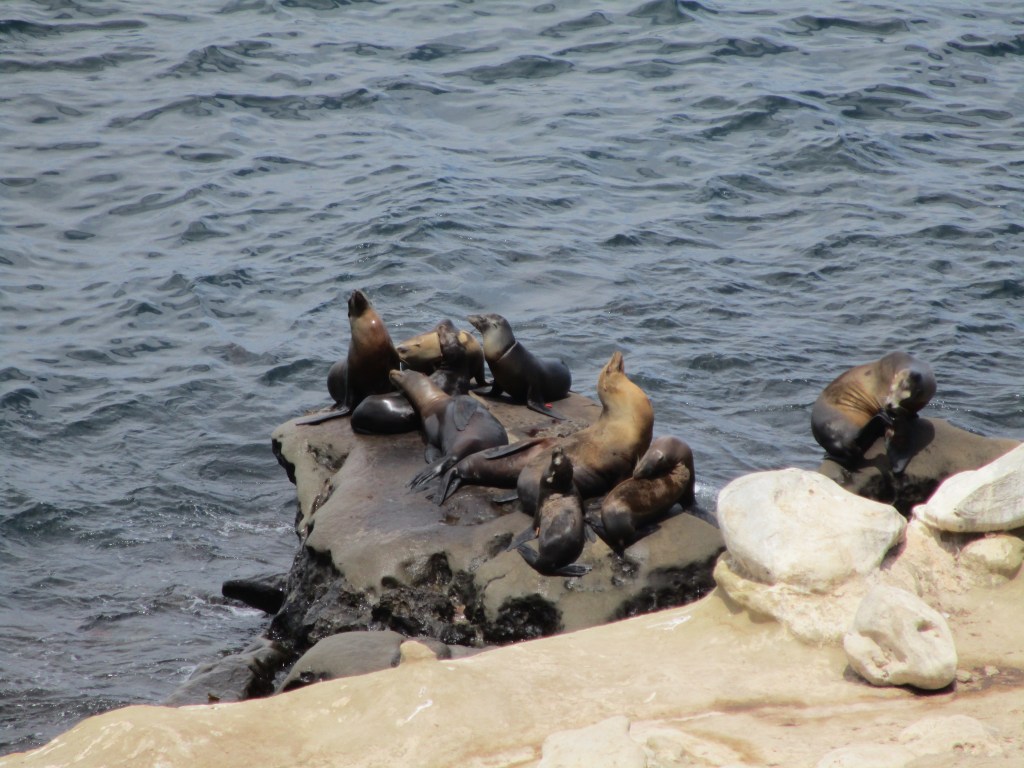
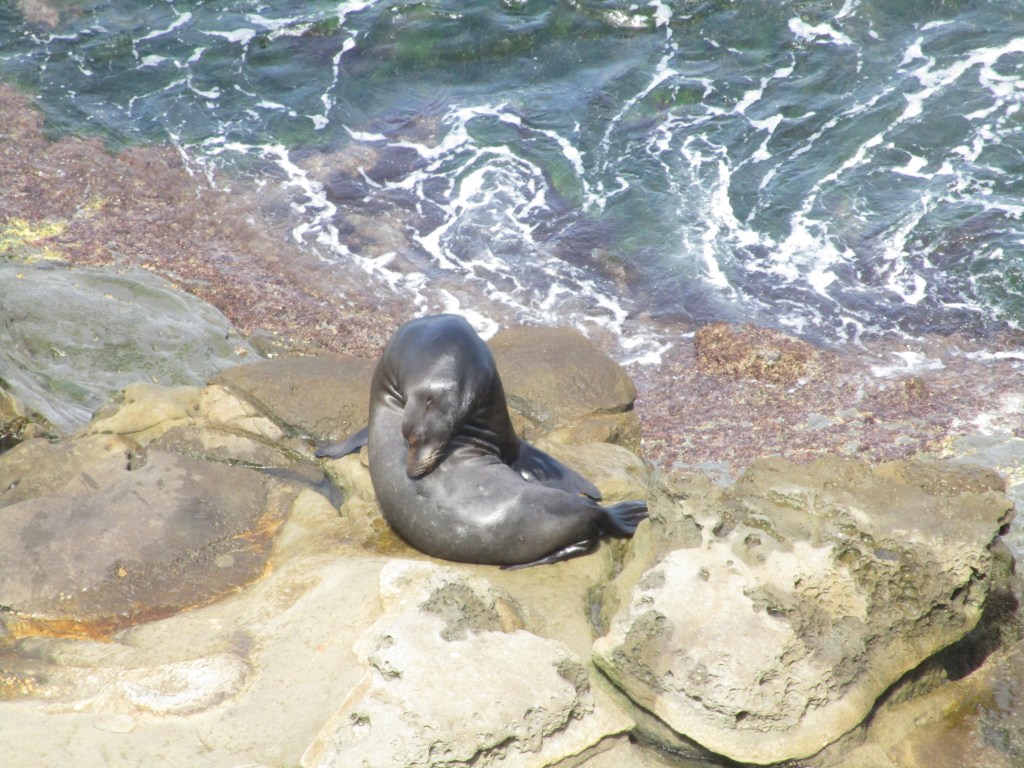
Kayaking in la Jolla is Beautiful. The clean water is surrounded by sandy cliffs that house California Seal Lions. Next to the sea caves there is a beach cove where sunbathers love to hang out. This is also a great spot to set up if you are planning to snorkel along the cliffside. California Sea Lions often come out and swim with the snorkelers. Be aware that these are wild animals that are protected. Do not touch or feed them.

To launch your kayak you will need to go to La Jolla Shores Beach. There is a kayak and canoe launch area there. You will be launching directly into the ocean and you will need to paddle quickly to get past the waves. Brandon and I both got soaked! Several tourist companies launch from this area. Be careful to avoid them when launching. Some people will fall out of their kayaks when launching , be prepared for this! Make sure all electronics are in waterproof containers.

To Kayak to the cliffside you will need to kayak in an open ocean area. There is a swim lane that passes through the area for triathlon athletes. The area is marked by buoys. Make sure to avoid this area and to watch out for swimmers.

La Jolla Sea Life

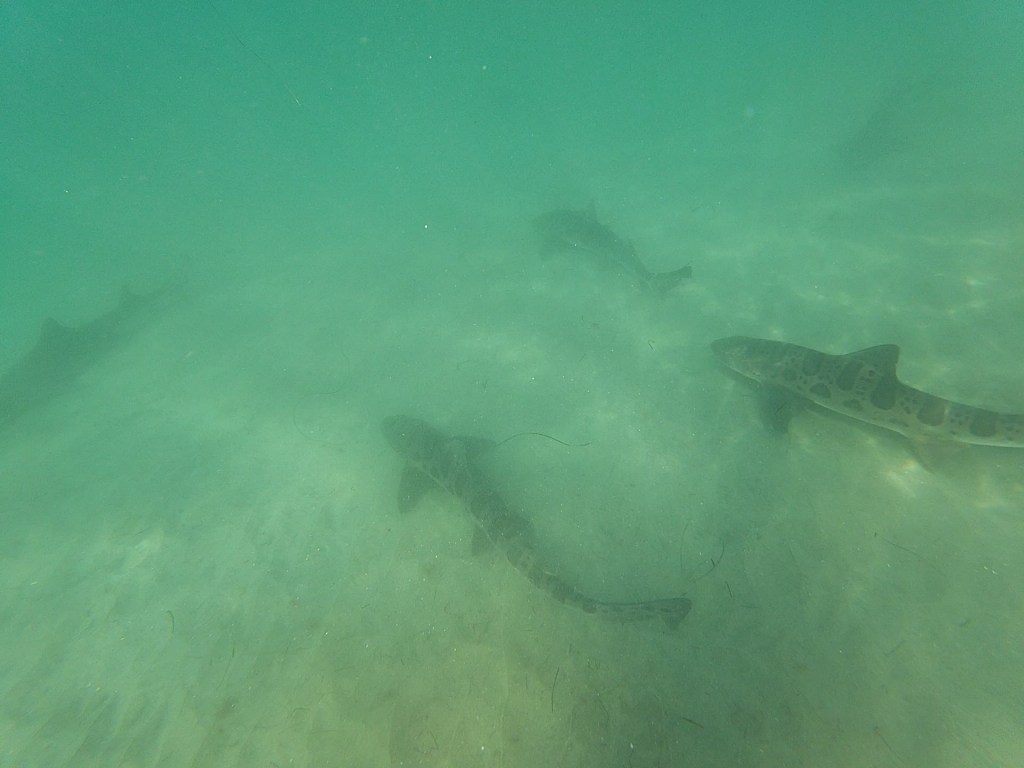
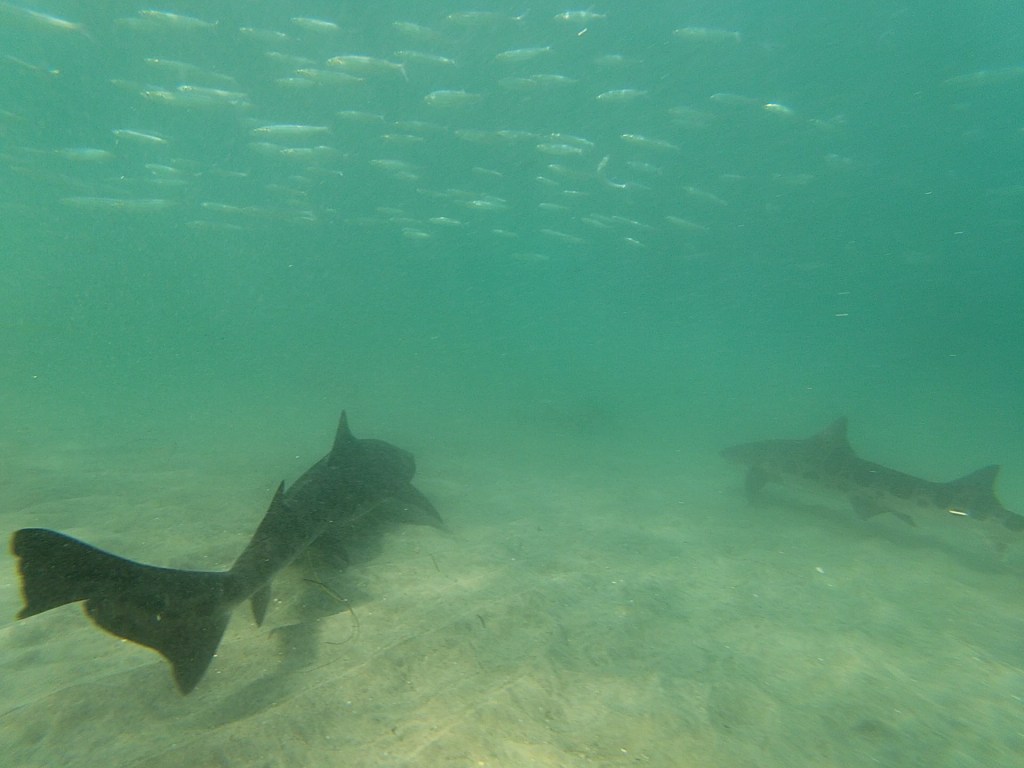
You will get to see a lot of wildlife while kayaking in La Jolla. If you are a fan of sharks then you will want o go kayaking during leopard shark breeding season. During this time you are guaranteed to see some swimming underneath your kayak. La Jolla is also one of the best places to see the California Sea Lion.

California Sea Lion: Claifornia Sea Lines are huge marine mammals that call the clear water of La Jolla home. The females can reach 5.5 feet in length the males can reach up to 7.5 feet. Most of the California Seal Lions in La Jolla cove tend to congregate by the sea caves. As you kayak by the sea caves you will see they lounging on the rocky outcropping of the caves.

Leopard Sharks: La Jolla is also known as one of the best places to go snorkeling with Leopard Sharks! Now I know that this can sound intimidating but these beautiful creatures are a once in a lifetime sight to see. The Leopard sharks come to La Jolla in the summer and Fall to be in warmer water while they are gestating their young.

Garibaldi: These Bright orange fish are a staple of La Jolla Shores and are an easy fish to spot as your kayaking overhead.

I hope this inspires you all to go out and visit La Jolla. It is a great place to go see the wildlife and gorgeous sea shores that California has to offer. As always, stay safe and make sure to bring food, water, and your PFD. Happy Travels!

Advertisement

Dreaming in Lucerne, Switzerland

Switzerland brought with it a variety of adventures. While in Switzerland I saw snow topped mountains, cute, colorful buildings, and got to go on a boat ride on Lake Lucerne. Everywhere I went the scenery was gorgeous! I couldn’t stop taking pictures (which is why this post has a ton of pictures in it!). If you love nature photography this is the place to go.

So before I tell you about all the fun stuff, here are some fun facts about Switzerland.  German is the main language spoken but citizens also speak French, Italian, and English. Switzerland has its own currency, the swiss frank. Some shops do accept euros but they will give you change in swiss franks. Another thing to know before going to Switzerland is that it is an expensive country to travel to. Food, hotels, and attractions are all pricey so make sure you have plenty of travel money set aside before going here. Finally, the most important thing…..Switzerland has amazing chocolate! There is even a chocolate museum in Lucerne.

The Lion Monument (German: Löwendenkmal):

20180404_175255

The Lion Monument or also known as the Lion of Lucerne was built to commemorate the Swiss guards that were massacred in 1792 in the French Revolution. The sculpture is very intricate and the expression on the lions face is touching in its sad, mournful quality. The monument is located at Denkmalstrasse 4, 6002 Luzern, Switzerland.

Pilatus Mountain Top

To get to the top of the mountain you need to take a cable car. The cable car varies in price depending on what stop you get off at and what time of year it is.  We went to the second stop which has a nice gift shop, small cafe, hotel, and viewing areas of the mountain. It was snowing very hard when we arrived but the snow cleared long enough for us to get out on the viewing platform to take pictures. I was told by the guest information booth that if you visit in the summer you can see the whole mountain and go on the walking path. I would love to come back and do that.

Lunch at the Stadtkeller

For lunch we went to the Stadtkeller, and had a spectacular fondue lunch. We had cheese fondue, a main entree, and then a chocolate fondue dessert. The restaurant was cute with lots of authentic decorations.

Lake Cruise with Charles Bucher

Lake Lucerne has a small boat harbor where several harbor cruise services are available. The boat ride we took lasted one hour and 15 min. The time flew by and I felt like we were turning back when we had barely gotten started. I would have loved to have spent several hours out on the water looking at all of the surrounding scenery.  The tour company was very nice and friendly and even let me wear the captains hat and drive the boat. And luckily I didn’t run the boat into anything (thank goodness).

20180405_152516

Chocolate at Au Cahet

20180405_170132

The chocolate truffles I bought at this shop were delicious. I was impressed by the variety of flavors available and the prices were reasonable. The street that this shop is on is lined with watch shops, swiss army knife shops, and other cafes that were fun to visit.

Chapel Bridge (Kapellbrücke)

The chapel bridge spans diagonally across the Reuss in the middle of Lucerne. It is a great place to get pictures of the cute buildings spanning either side of the Reuss.

I hope you enjoyed reading this article and that you learned about some of the fun things to see and do in Lucerne, Switzerland. If you have any questions about my travels feel free to comment below. Happy Travels.

20180406_071419

Traveling in Europe-Tips and Tricks to Surviving your first time Over-Seas

Okay, lets face it. Traveling can be scary, nerve-wracking, or just down right stressful. The first time I went to Europe I was so worried I would lose my passport and be stuck in a foreign country. This was especially worrisome for me because… 1. I was traveling alone and 2. I tend to lose everything. And I seriously mean everything. But after a lot of trial and error ( and lot of stress chocolate) I have learned how to successfully travel to Europe without all the stress and worry.  Hopefully reading this article will help equip you with the skills and knowledge needed to navigate a trip to Europe.  So lets get started!

Before Traveling

  1. Get some Cash Out! Before traveling I recommend going to your local bank at home to obtain the currency of the country you are going to. Make sure you plan ahead when doing this because sometimes the bank with need a couple of days to mail in your needed amount of currency. It is important to have some cash on hand when you arrive. You can use this to pay for a taxi or whatever transportation service you are using to get to your accommodation. There are usually ATM’s or Cash Exchange Services at the airport but they often times charge huge amounts to exchange your currency. Avoid the huge fees by coming prepared with cash already in hand. Also, make sure to hide some cash is a secret place. Pick-pockets are very bad in Europe and you will need to have some cash handy if your wallet is stolen.
  2. Buy credit card and Passport sleeve protectors! Credit Card CoversAs mentioned before pick-pockets are bad in Europe. However with advances in technology comes advances in preventing pick-pocketers. To prevent people from scanning your credit card or passport information as they walk by you can purchase sleeve covers. I have one for all of my credit cards and one for my passport. I bought mine on amazon:)
  3. Outlet Converters– Make sure you have a power outlet converter that meets the standards of the country you are traveling to. This is extremely important because without it you will not be able to charge your phones, laptops, ipads (you get the picture). It is also super important for other electronic products such as hair curlers or straighteners. There are several different options and you can usually find these a stores such as Walmart or Target.

Flying in Europe

  1. Liquid containers for carry-on Bags. Quart sized BaggieThere are many important things to know when flying in Europe. First, they have a very strict liquids allotment for carry on bags! You are only allowed to have a quart-sized bag of liquids in your carry on. They will throw away anything that doesn’t fit in the quart sized bag (I have seen this happen and they do not care if it is expensive products). Another thing I was surprised about is what they consider a liquid. Lip gloss, foundation and even chap stick are all considered a liquid. I had my bag pulled aside and checked because I didn’t have my chap stick and lip stick with my liquids. Luckily I had enough room in my bag to fit these products but I have seen other fliers who had to throw away some of their belongings. This is very sad and don’t let it happen to you!

Arriving in Europe

  1. You have to pay for most public restrooms. This was a very foreign concept for me being from the United states where public restrooms are free. This is not the case in Europe. Most bathrooms, including those in train stations and bus stations require money to enter. Also, many of these money machines only except exact change. I always try to keep  2 -3 Euros in coin change when traveling.

2. Pick Pockets! Pick pockets are prevalent in most major cities in Europe. Some tips to avoid getting your belongings stolen are as follows: If wearing a backpack in heavily congested tourist areas switch it around so that it is facing forward. This might look funny but it helps you keep an eye on your things and helps prevent pickpockets from slashing the bag open with a knife. This has happened to several of my friends, don’t let it happen to you! You can purchase clothing with hidden pockets. I have a scarf that has a hidden zipper pocket. Another tactic is to wear purses across you body instead of just hanging on your shoulder. The best thing is to always be aware of your surroundings!

I hope these tips will help you be prepared to travel overseas. I will have more articles coming with more tips and tricks. Stay safe and happy travels!


Joshua Tree National Park


What do you get when you mix deserts, giant boulders, and thunderstorms? An unexpectedly adventurous trip to Joshua Tree National Park! Needless to say there were some exciting events on my trip to the park that made it a weekend I will never forget.

First, finding an open campsite was very difficult. If you want to camp at Joshua Tree during the Fall, Winter, or Spring on the weekend you need to reserve a campsite, often weeks, if not months in advanced. I was lucky to get a canceled reservation at the Cottonwood Campgrounds at the south end of the Park. I was only able to get a one-night reservation. Getting a two-night reservation at the park on the weekend is extremely difficult to do last minute so if you are planning a spontaneous trip to Joshua Tree then try to go during the week when the park is less crowded.

Okay to give you the lay of the land so to speak…most of the main campsites are at the north end of the park where the Joshua Tree Forest is. The south end of the park does not have Joshua Trees. So, plan ahead on which attractions you want to see before going to the park. I highly recommend checking out the Joshua Tree National Park website to view a list of campsites and sites to see before heading to the park: https://www.nps.gov/jotr/index.htm.

Cottonwood Campground

The Cotton Wood Campground was very nicely set up with fire pits and picnic tables at every campsite. There were also flush toilets and well water available. Overall, I was impressed by how clean and organized everything was. Also, at our campsite there was a little Kangaroo Rat I named Fluffy. If you have never seen a Kangaroo Rat, they are the cutest things ever! Google it! The campground was also conveniently placed next to the Cottonwood Visitor Center for the park. Here there is a gift shop. Park rangers are also available to talk to about hiking and nature viewing options. This is also the place you can get the cancellations for your national park passports…if you have not started doing this I highly recommend it!

The passport books allow you to get a cancellation (or stamp as I like to call them). Every park has a cancellation and sticker that you can collect. The parks sell small and large collectible passports that you can put the cancellations and stamps in. It is so much fun, and admittedly I am addicted to trying to get as many cancellations as I can😊.

Mastodon Peak Hike

The Mastodon Peak Hike leaves out of Cottonwood Campground A. This hike was a 2.4 mile loop that took roughly an hour and a half. The trail was nicely maintained and had lots of signs to keep you going in the right direction (this is especially important to me because I tend to get very lost very easily). The trail is mostly through a dry riverbed and consists of very deep sand footing. You will get a great leg work out! The rock formations were spectacular and there were several signs to designate the different plants and flora on the trail.

The trail takes you to the Mastodon abandoned mine that is located beneath Mastodon Peak. The 0.1 mile detour hike to the top of Mastodon Peak is an unmaintained trail and included climbing over large boulders to reach the top. Use caution if climbing to the peak. The view from the top was spectacular and you could even see the Salton Sea in the distance (the title photo was taken from the lookout point).

On the way back you pass the Cottonwood Spring. You cant see the water directly but there are several large palm trees in the area that were very impressive. There is a trail head directly from the springs to the campground. You can use this to walk to the springs from the campground if don’t want to walk the whole trail. The Mastodon Peak trail itself is a full loop.

The Storm

Our one and only night at the park was very eventful. The night started out clear and by 9pm you could see the whole milky way. One of the reasons I came to the park was to see the stars and I was not disappointed. However, at roughly 12am a huge thunderstorm hit. Within an hour a flash flood roared through our campsite and washed away most of our stuff. Luckily, we were staying in a converted camper in the back of my boyfriend’s truck but other campers in our campground were not as lucky. Some people were washed away in their tents! No one was harmed and the people who were washed out of there tents were able to take shelter in the bathrooms of the campground. Firetrucks came to check on us at roughly 2am.  By morning the whole campground and park had been destroyed. We had planned to drive up to the northern end of the park to see the Joshua Trees but all the roads in the park had been washed out and the park was closed. Luckily we had a truck and were able to make it out but we had to avoid giant boulders that had been washed into the roads. It was definitely a trip to remember!

Overall the trip to Joshua Tree National Park was so much fun. The storm was unexpected and very scary but luckily no one was hurt. I would love to go back to the northern end of the park so I could actually see a Joshua Tree. But, I got the next best thing. At the visitor center they were selling Joshua Tree seeds. So of course I bought a pack so I can have my very own Joshua tree! Follow me on Instagram @adventuresinlife.blog to see updates on the tree’s growth!

I hope you found this post helpful and if you have any questions about the trip feel free to comment below. Also, I know your all wondering, Fluffy the Kangeroo Rat survived the storm. We saw Fluffy the next morning:) Check out my instagram for a video of Fluffy. Happy Travels!

***disclaimer: I am not responsible for content on external sites.